I Created A Deep Sea Monster & Alien Xenomorph Fusion
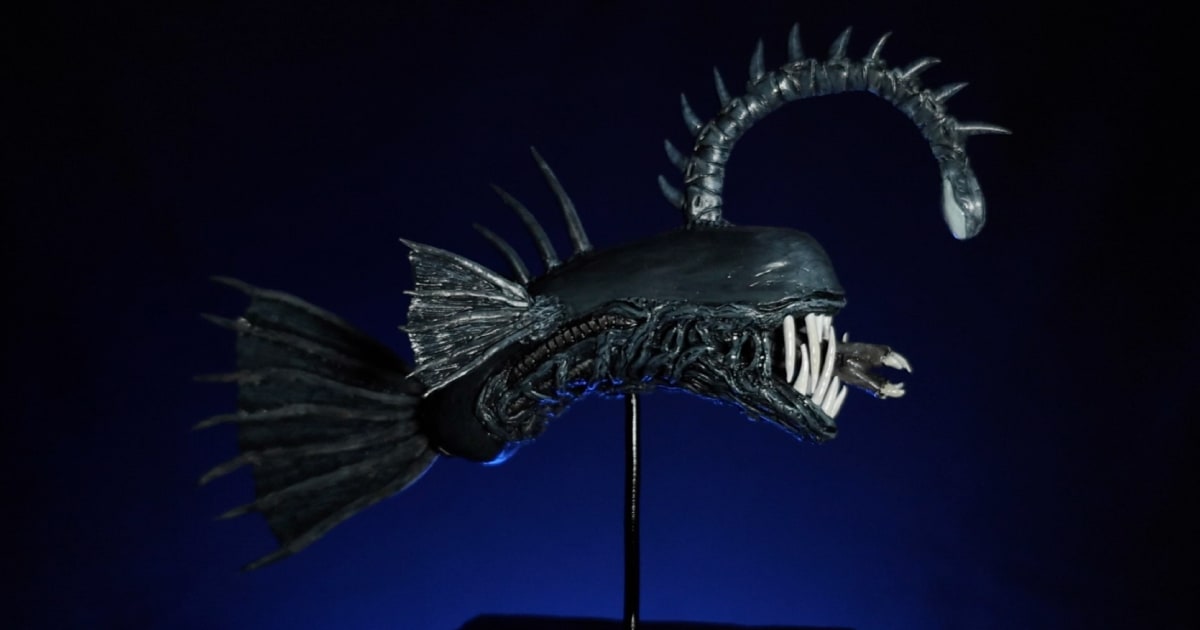
What happens when the mysteries of the deep sea collide with the terrifying universe of the Alien Xenomorph? A one-of-a-kind fusion that’s equal parts eerie and fascinating!
In this project, I take you behind the scenes of my creative process, from the first sketch to the final sculpt. Whether you’re a sci-fi fan, a creature designer, or someone who loves unique art, you’ll be thrilled to see how these two iconic worlds come together.
Ready to take a deep dive into my latest sculpture? Let’s create a monster like no other!
The Concept & Design Process
This Alien Deep Sea Monster was one of the few sculptures that I made a drawing of before I started playing with clay.
With the latest Alien movie just released, I decided to try and see what I could make. I did a little research on the tinterwebs and, when searching for aliens, came across one of the aliens of the deep sea: the Angler fish.
And then the idea was born. I decided to merge the head of the Alien Xenomorph with the fishy features of the angler fish to create what you see below.
As usual, my sketch is just a basis for what I actually create. I use my artistic license to change things around as I sculpt, sometimes to make things a little easier and sometimes just to find a better version of my original vision.
Getting Ready to Sculpt the Fusion of Two Alien Creatures
Before I started to sculpt, it was time to clean my workspace, figure out which sculpting tools I needed and condition my clay.
For this sculpture, I used the popular Polymer Clay CosClay. It comes in three different firmnesses: medium, medium firm, and firm, but whichever you choose, it still tends to be softer than Sculpey. This isn’t always a good thing, as details can get lost when modelling.
One advantage of CosClay is that if you bake it right, it tends to be a little more flexible than other Polymer Clays on the market.
Sculpting The Alien Xenomorph Deep Sea Fish
Once the clay was put through the Pasta Maker a few times to flatten it and make it easier to work with, it was time to start on the body of my fictional creation.
For this one there was no tin foil in sight. As I was trying to keep the sculpture small anyway, I rolled up the clay and gave it a squidgeroo into the shape of an aubergine.
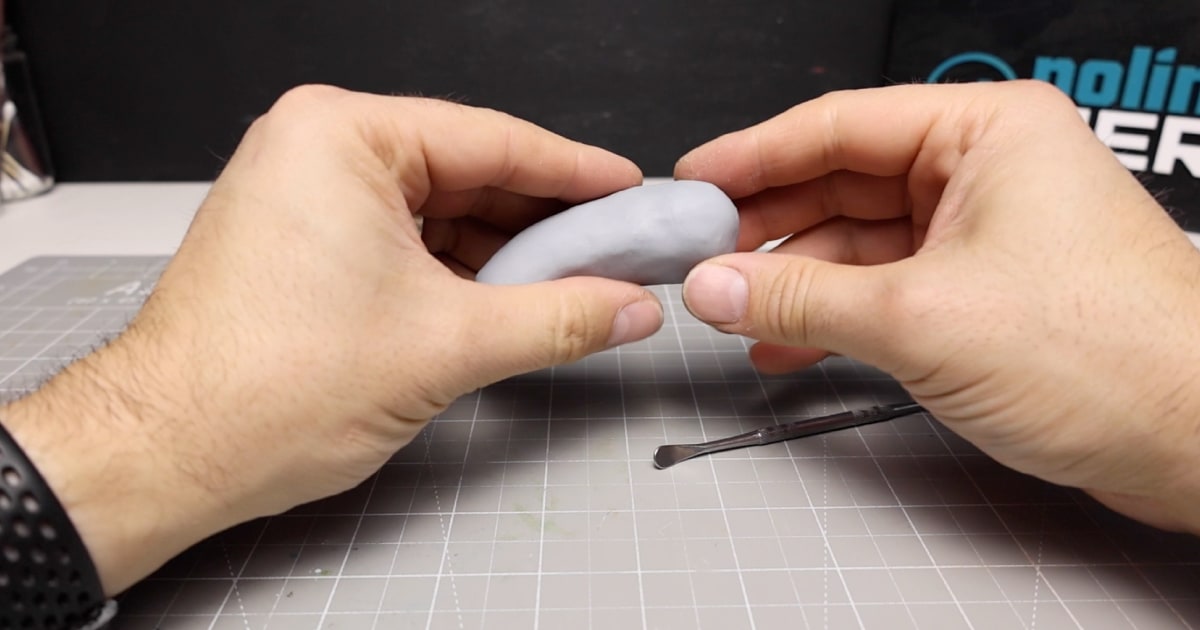
This formed the shape for the body/ alien head, which I then put a slit at one end to create an opening for its mouth. I then hollowed out the insides of his mouth with my sculpting tool for a place to put its second mouth, the inner jaw or so-called pharyngeal jaw.
Interlude – Off Screen Base Creation
Once I had done that, I quickly made a base to hold the sculpture to make it easier to move around and hold without ruining the details I had added. I cut a square out of offcuts of 18mm hardwood plywood and added a 3mm piece of armature wire to the centre of it to hold the figure.
Back to the Base Model
Once I had placed the head and body in position, I rolled up some worms to create a top and bottom gum and added them to the mouth as a place for the teeth to sit.
After I’d created the mouth, it was time to mark out where the details were going to go. I started adding in a few worms at the sides for the tubes of the alien head and some thinner sausages of clay to form the organic-looking underneath of the head.
Making The Alien Teeth
With the head roughed out, I rolled out a super thin sausage of clay, making the end to a fine point. I then used my scalpal knife to cut the clay and laid the newly formed pointed teeth onto a baking sheet on a baking tray, ready to bake.
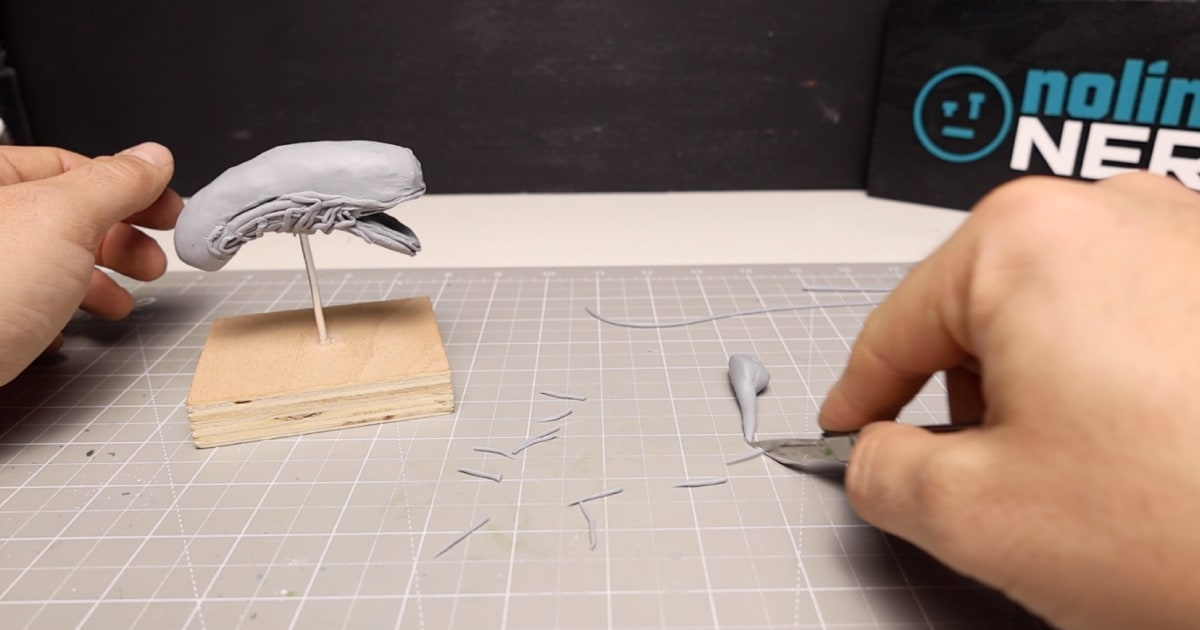
I once again learnt the lesson from making the Lovecraftian Rock Worm, that hard, pre-baked teeth are easier to add to a soft clay model than soft teeth, which squish, squash, and deform easily, especially with my chubby fingers.
Now, these teeth might not look like the Alien teeth you’d see in the iconic aliens from the movies, and you’d be right. These teeth focus more on the ones you’d find out the deep sea angler fish. This version is a fusion of the two, and they came out a whole lot better.
Time To Make the Inner Jaw (pharyngeal jaw)
Aside from the instantly recognisable design of the aliens inspired by the Swiss artist Hans Ruedi (H.R.) Giger, one of the parts of the Alien that is also very remarkable is the second mouth that shoots out of its mouth.
To make this, I rolled up a thick sausage that would fit inside the mouth. I then shaped the end to give it a mouth shape with a few pointy teeth on the end. Using my reference picture, I added some detail to the shaft of the mouth to make it look as it should.
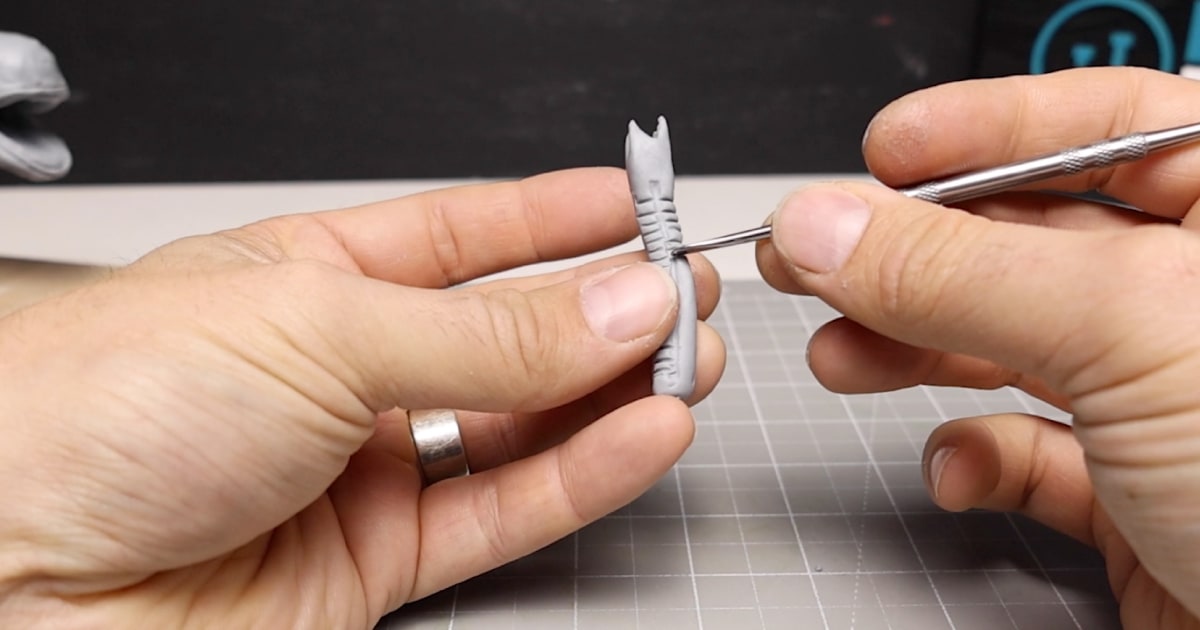
Then, it was time to test fit.
Test Fitting is Key To Success
I then twisted together some 1mm wire and inserted it into the end of the mouth that fits into the other mouth. This lets me securely connect the second mouth to the right position while I test-fitted the teeth.
To test fit the teeth, I inserted the mouth, and then, with the teeth now baked and hard, I inserted them into the gums around the mouth. I picked smaller ones for the sides and larger ones where the mouth opens its widest.
If there weren’t any that fit, I cut them to size with my knife.
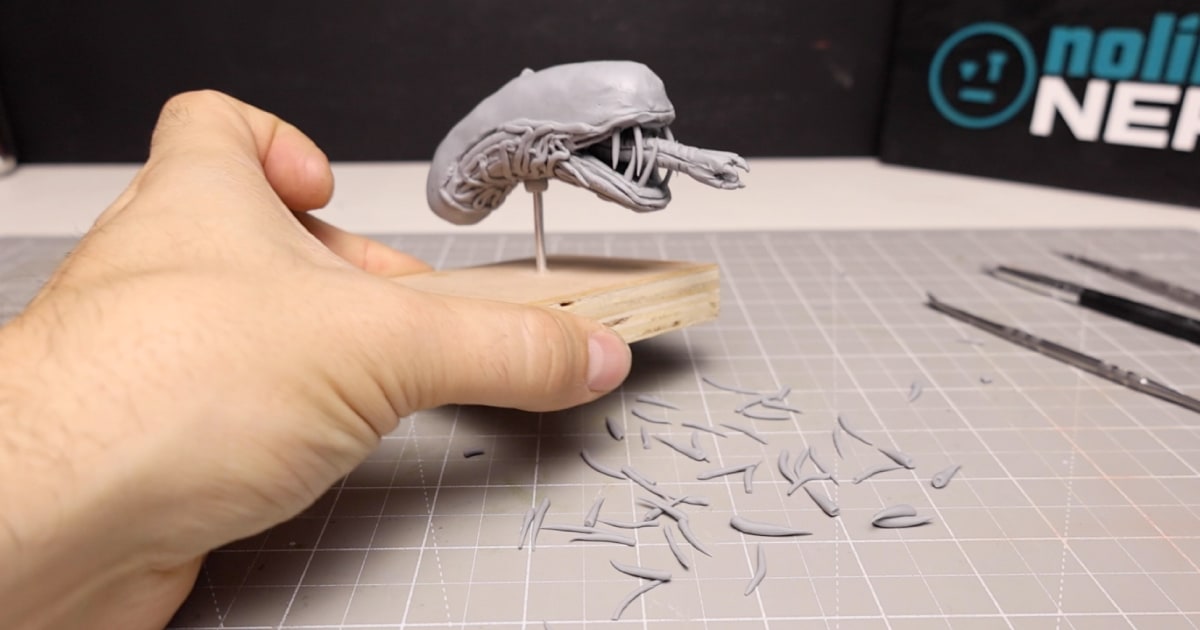
Test fitting gave me a location for the teeth once the model was baked. I also found out that the mouth was too long and needed shortening, which was easily done by cutting off the end and snipping off a little of the armature wire.
Top Tip: Always make more teeth, eyeballs or any other small parts than you need cause, no doubt, some will break when you start to test fitting or adding them to the final clay sculpture.
Making the Light
If you’ve never seen an angler fish before, they have a bioluminescent light dangling in front of their heads to try to attract their prey in the dark depths of the ocean.
I decided to recreate this; however, instead of just doing a dangler with a light, I tried to recreate the tail of the Alien Xenomorph with its sharp bony bits.
To do this, I took some twisted together 1mm armature wire and formed an ark to give the dangler structure. I then wrapped it in polymer clay and test-fit it against the head to see how it looked.
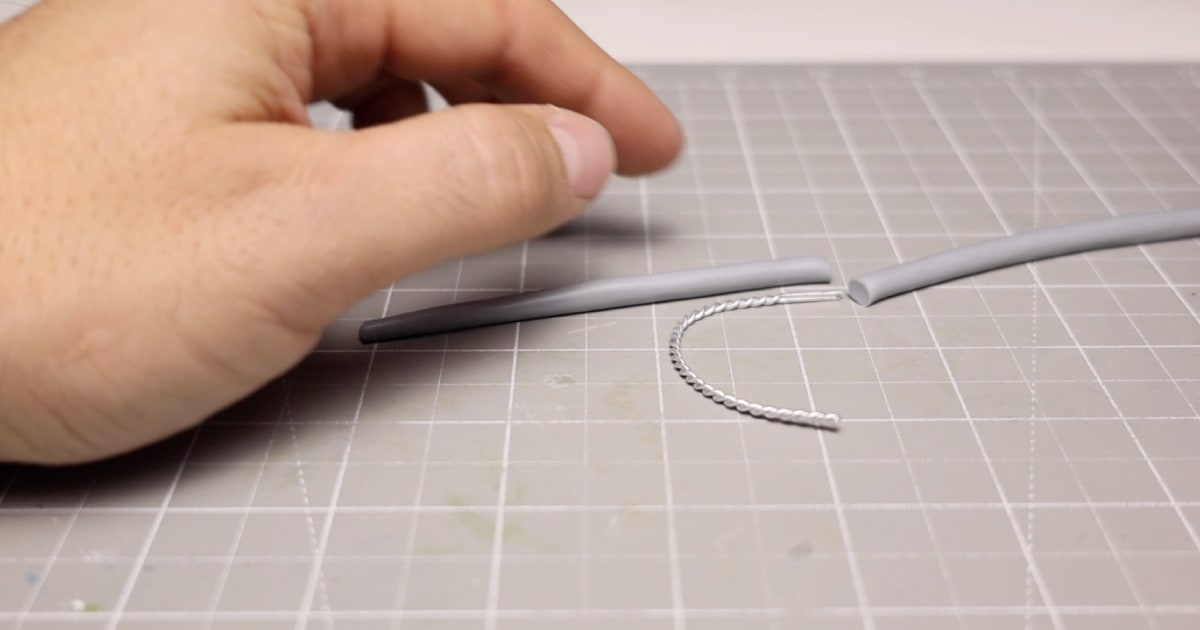
With the length and ark about right, I added some detail. I squished small balls of clay onto the top of the ark and then blended them in to make it look more like a spine. You can see that in the picture.
As I was making this up as I went, I then test-created one of the spikes before rolling out a sausage of clay, forming a point at one end, and cutting to size. I then gave it a little bend and put it on a baking sheet ready for baking. As you might know by now, it’s easier to add a hard spike than a softer one.
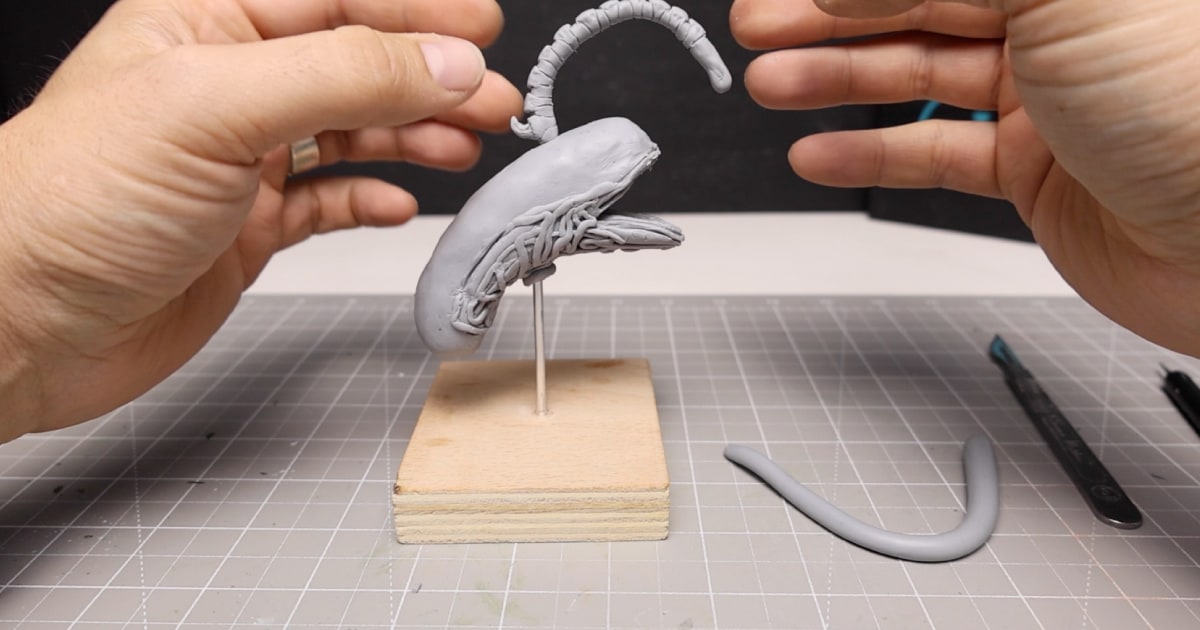
I then split the end of the light rod where the light was going to go into four by making two cuts. I then rolled out a ball to add to the end for the light, wrapping the split parts of the rod around it. It sounds more complicated than it is.
Every Alien Fish Needs Fins
I wasn’t quite sure where to start on the to-side fins and tail fin. First, I rolled out a flat piece of clay and cut in some lines to try to create a fin-like shape, but this didn’t quite work.
In the end, I ended up rolling out worms of clay and joining them all together at one end. I then cut small strips of flat clay and laid them in between the worms (spines), joining them to the worms with my sculpting tool.
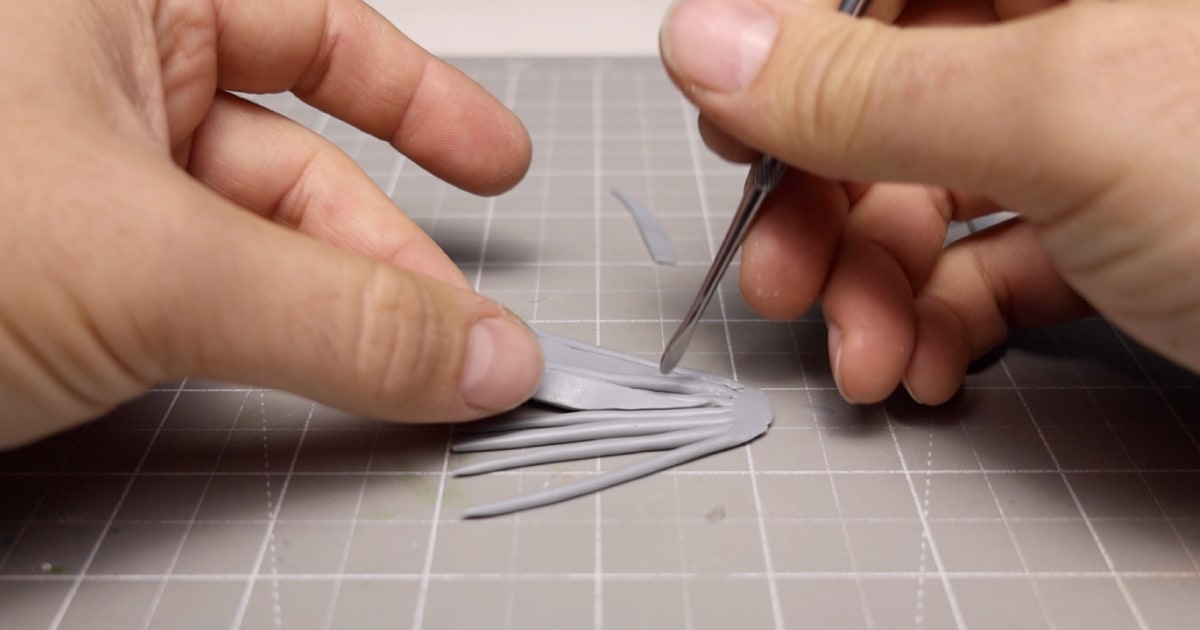
I then added some lines to the flat part of the fins to give it some detail.
I repeated the same process for the side and tail fins and then laid them on the baking tray ready for baking.
Detailing The Underside
So earlier I added worms to the underside of the head/body, these were just roughed out ready for adding more detail to later. And now is the time to add that detail. I used my detailing tool with a small round end and started adding lines into the worms.
I continued around all of the underneath until it looked like organic fleshy parts, which resembled something you’d find on one of the aliens.
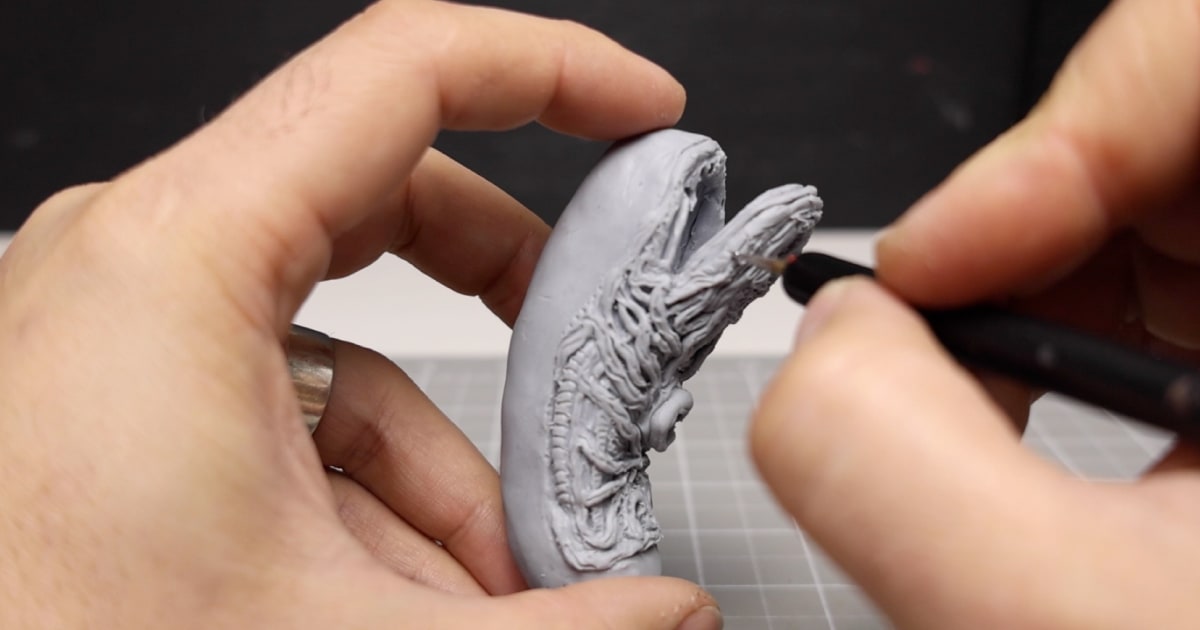
Was it perfect? No. Did it do the job? Yes. I was happy enough with the outcome to move on to making some spines for the back in the same way I did the teeth.
Adding It All Together
Everything is now baked according to the instructions on the CosClay packet, which are 30 minutes in a 130C oven for every 1/4 inch thickness of clay.
It was then time to start putting everything together.
I added the spines, the light, and the fins using Green Stuff epoxy putty to ensure that they stayed in position more securely than just adding a little super glue, which is what I usually do.
With the spare green stuff I had, I also added some details to the mouth in the form of ligaments, giving it that Alien look.
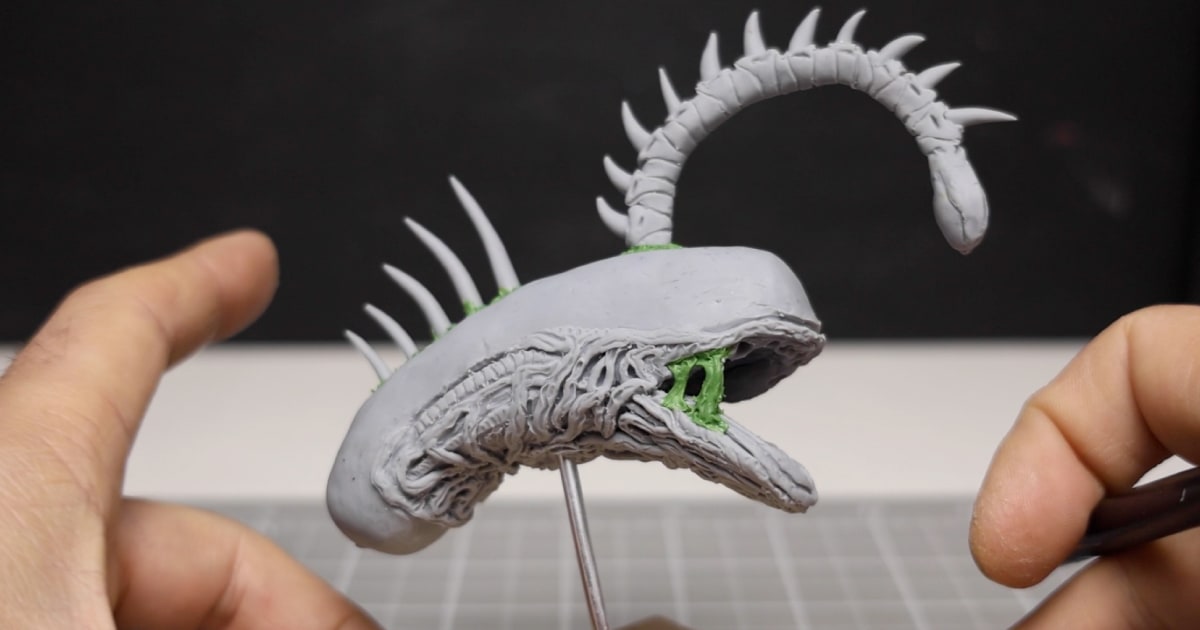
With everything now assembled, I left it overnight to harden appropriately, and then it was time to paint.
Painting The Deep Sea Alien Hybrid Creation
When it came to painting, I preferred the colour scheme of the Alien over the angler fish, so I painted a base coat of black acrylic over the clay and green stuff to seal it using my newly acquired cheap airbrush before adding the finer details with my brushes.
After the base coat, I strapped the teeth to some masking tape and sprayed them with a base coat of white.
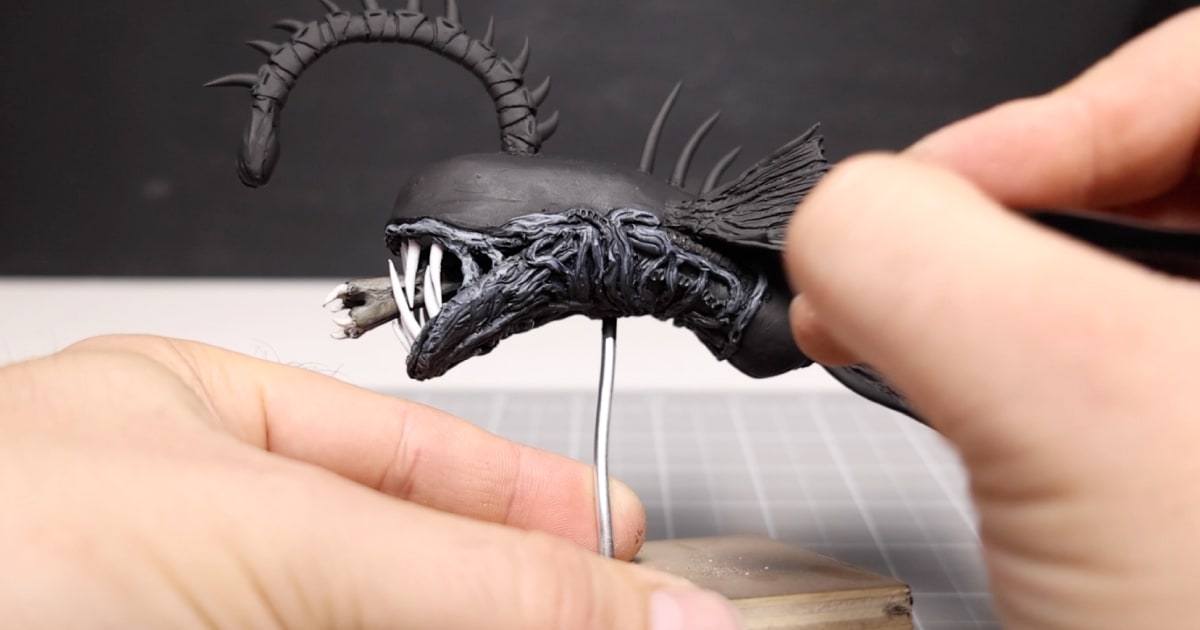
I then inserted the second mouth into a cork to make it easier to hold while I painted it. I chose darker washes of blacks and browns for the outside of the mouth and a bony white for the teeth.
For the alien head’s main mouth, I used a light blue thinned down to let the black underneath show in parts. I then added the now bright white teeth and second mouth into position before painting the rest of the body a darkish blue/black colour.
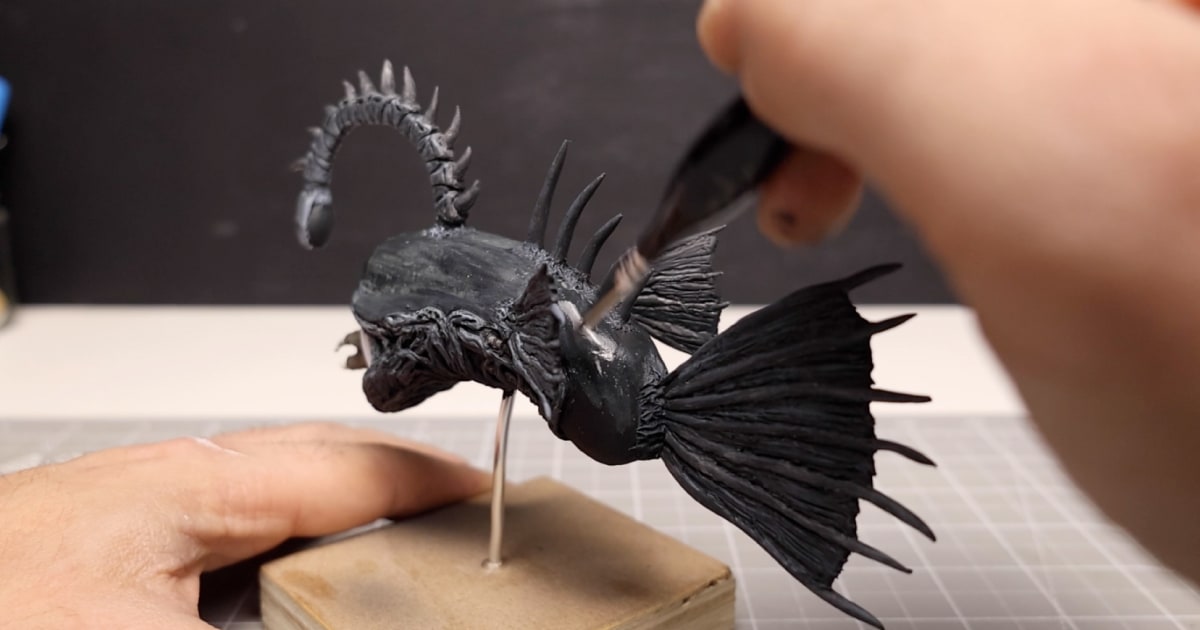
I continued this colouring for the fins, spines and the light spine thingy magigga.
Adding the Highlights and Washes
With the base colour added, I started adding highlights to certain areas of the fins, light and body using a lighter blue and white on a dry small brush.
Then, I turned my attention to the body, for which I used a green wash, layering it up until it looked like it should.
Making It All Shiny
I added the finishing touches to the light and a few more highlights before varnishing the whole sculpture with a couple of coats of gloss.
Once the gloss was dry, I added a few drops of UV resin to the light and teeth to make them look even more shiny, and I cured them using my UV light.
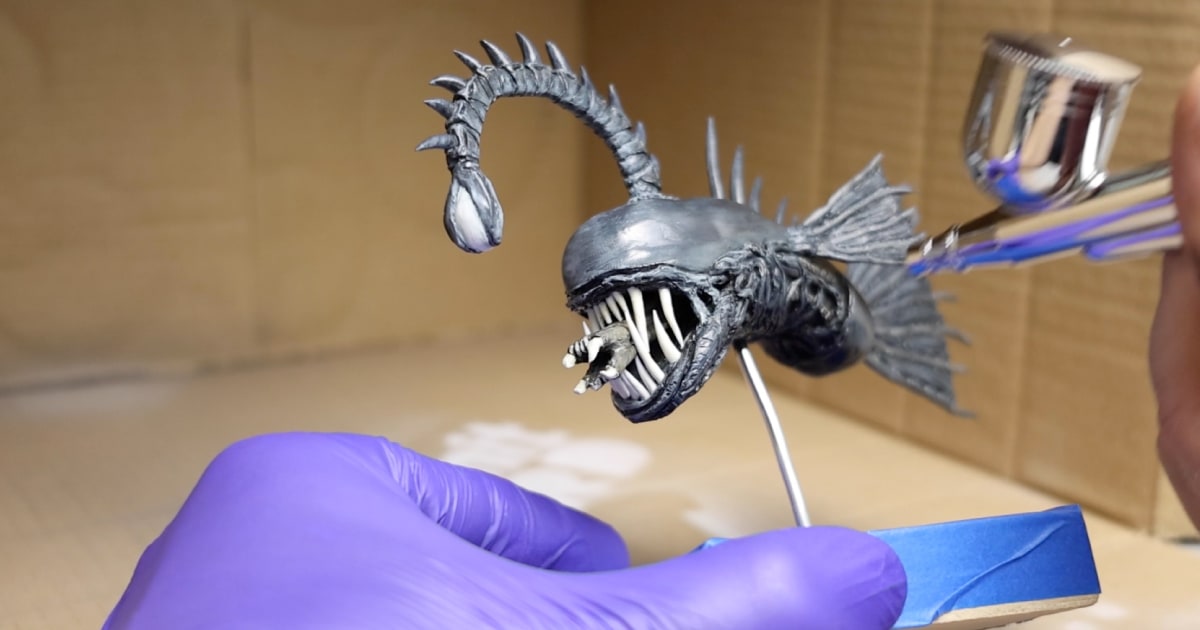
After that, it was time for the reveal.
Oh yeah, I painted the base and armature wire holding the model in gloss black to make them shine.
Summing Up + Watch More Videos & Have Fun
Every time I complete a project, I breathe a sigh of relief that it’s finally done. Even though I enjoy creating these sculptures and models, the time pressures to try and create one a week are sometimes difficult to handle, along with the other pressures of family life.
This Alien creation was certainly fun to do. Merging two worlds into one certainly creates something unique, and you won’t see another one anywhere else in the world.
So, I encourage you to fit some sculpting into your weekly regime, especially if you enjoy being creative. Or just pick up a pen and start doodling. Whatever your creative nerdiness is, then just have fun.
I’d love to see your sculpting masterpieces and artwork! Share your creations by commenting on my YouTube video and inspiring others.
If you’re looking for more inspiration, don’t forget to check out my other videos. As always, you’ll find them first on my @NoLImitNerd YouTube channel, so please subscribe.
I’ll catch you next time.
Tools I Used
Heads up. Some of these links are affiliate links if you click on them and buy something I might make money which will help you support NoLimitNerd at no extra cost to you.
Sculpting Tools
- CosClay
- Green Stuff
- A2 Cutting Board
- Pasta Maker
- Sculpting Tools
- Modelling Tools
- UV Resin
- UV Light
- Vinyl Gloves
- Armature Wire 1mm
- Armature Wire 3mm
- Super Glue
Painting Equipment
- Paint Brushes
- Acrylic Paints
- Valejo Airbrush Thinner
- Air Brush Kit
- Air Brush Cleaner
- Gas Mask
- Acrylic Gloss Varnish
Filming, Audio & Tech
- Cannon EOS R8 Camera
- Cannon RF 50mm Camera Lens
- Lexar 128GB SD Card
- Softbox Lighting with Diffuser
- Camera Tripod Ball Head
- NEEWER Led Lights
- Fifine Microphone (USB)
- Rotating Display Turntable
- Black Backdrop Cloth
- Microphone Arm – for Overhead Camera
